目录
简介
修改插件样式的方式有多种,可以直接通过wordpress自带的插件文件编辑器修改插件文件,但显然插件更新时需要重新修改。本文将介绍通过”自定义HTML“模块来修改通过简码插入的插件样式。
前言/起因
起初是想建一个在线播放音乐的网站,需要一个音乐播放器插件,且需要带有播放列表,循环播放等功能。但一直找不到好用的,最后找到了一个功能上满足我的基本需求的插件:AudioIgniter。但它的外观没有长在我的审美上,于是用上刚学俩星期的前端三件套,走上了自己动手,丰衣足食的道路。
AudioIgniter样式对比
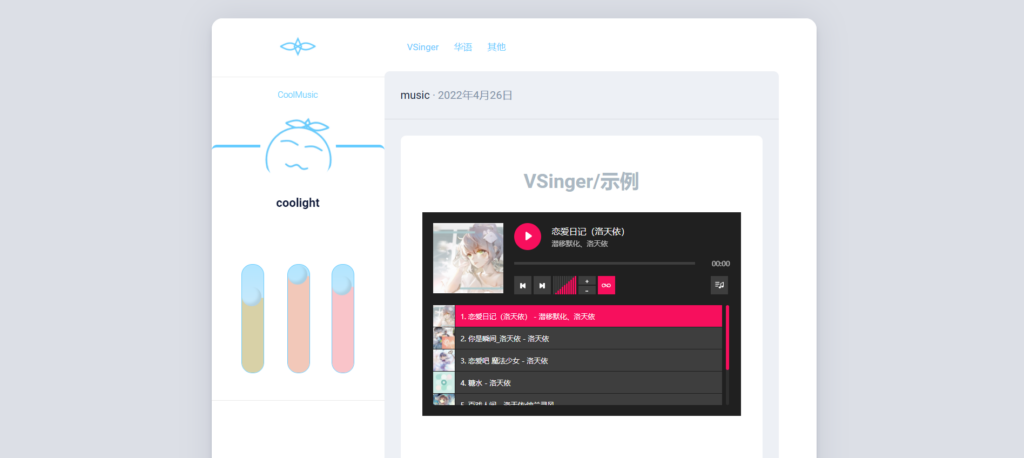
- 原来的样式:

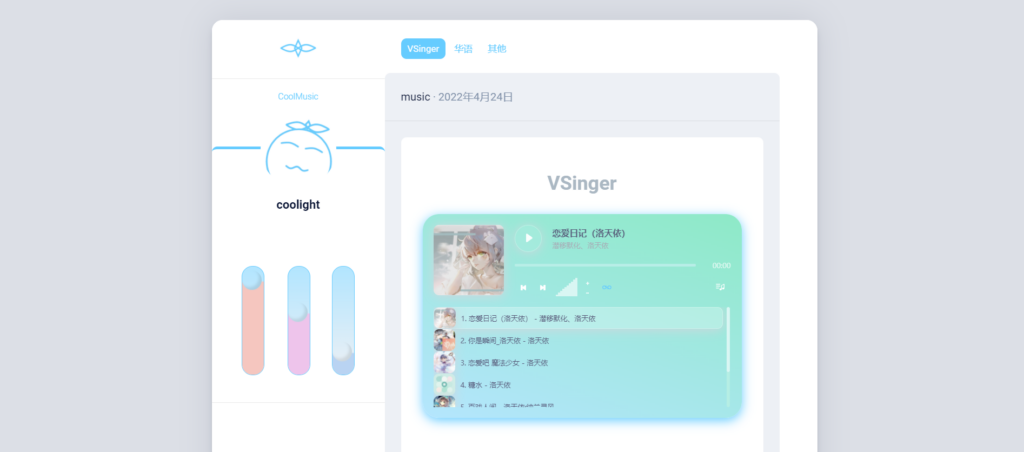
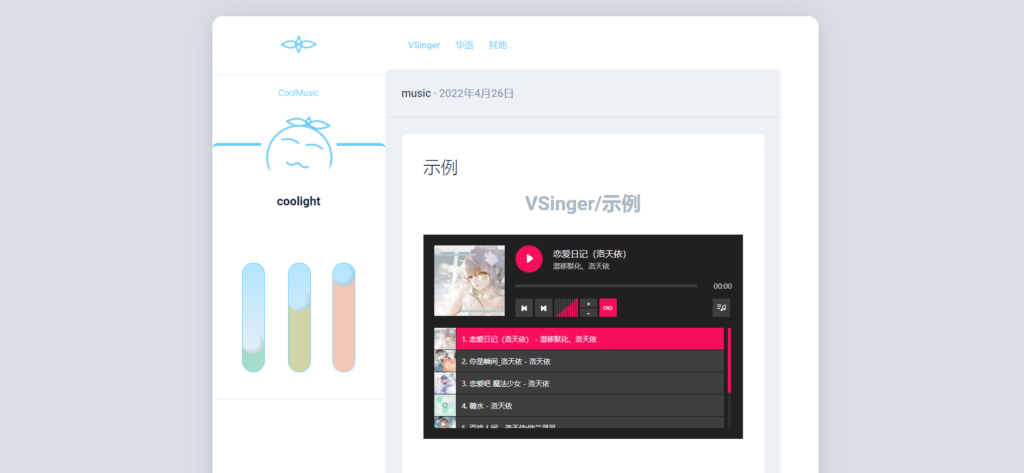
- 一顿修改后的样式:

- 在网站整体上看:
AudioIgniter插件样式源码/使用方法
样式源码
<style>
/*取消原来的部分设置*/
.ai-wrap .ai-track.ai-track-active, .ai-wrap .ai-track:hover {
    background-color: transparent;
    background: rgba( 255, 255, 255, 0.25);
}
.ai-wrap .ai-track {
    background-color: transparent;
}
.ai-wrap .ai-track-control{
    border-left: transparent;
}

/*播放器背景div*/
.ai-wrap{
    background: linear-gradient(200deg,#8eeac7,#b5e6fe);
    /* 溢出隐藏 */
    overflow: hidden;
    /*圆角*/
    border-radius: 30px;
    /* 阴影 */
    box-shadow: 0 5px 20px rgba(102,204,255,2);
}

/*播放列表*/
.ai-track{}
.ai-track:hover, .ai-track-active{
    background: rgba( 255, 255, 255, 0.5 );
    backdrop-filter: blur( 6px );
    -webkit-backdrop-filter: blur( 6px );
    border-radius: 10px;
    border: 1px solid rgba( 255, 255, 255, 0.3);
    /* 阴影 */
    box-shadow: 0 2px 20px rgba(208, 216, 222, 1);
}
.ai-track-name{
    font-weight: 900;
    color:#535273;
}

/*专辑图*/
.ai-wrap .ai-track-no-thumb, .ai-wrap .ai-control-wrap-thumb{
    background-color: transparent;
}
.ai-track-no-thumb, .ai-track-thumb, .ai-wrap .ai-control-wrap-thumb{
    background: rgba( 255, 255, 255, 0.2);
    backdrop-filter: blur( 20px );
    -webkit-backdrop-filter: blur( 20px );
    border-radius: 10px;
    /* 阴影 */
    box-shadow: 0 2px 20px rgba(208, 216, 222, 1);
}


/*正在播放歌曲的标题*/
.ai-track-title span{
    font-weight: 900;
    color: #535273;
}
.ai-track-subtitle span{
    color:#b187a2;
}

/*播放/暂停按钮*/
.ai-wrap .ai-audio-control, .ai-wrap .ai-audio-control:focus{
    background-color: transparent;
    background: rgba( 255, 255, 255, 0.1);
    backdrop-filter: blur( 20px );
    -webkit-backdrop-filter: blur( 20px );
    border-radius: 50px;
    border: 1px solid rgba( 255, 255, 255, 0.3);
    /* 阴影 */
    box-shadow: 0 2px 20px rgba(208, 216, 222, 1);
}
.ai-wrap .ai-audio-control:hover, .ai-wrap .ai-btn:hover, .ai-wrap .ai-btn.ai-btn-active:hover{
    background: rgba( 255, 255, 255, 0.35);
}

/*控制按钮*/
.ai-wrap .ai-btn{
    background-color: transparent;
    background: transparent;
    border-radius: 10px;
    border: transparent;
}

/*循环播放按钮,选中状态*/
.ai-wrap .ai-btn.ai-btn-active{
    background-color:transparent;
}
.ai-wrap .ai-btn.ai-btn-active svg{
    fill: #66ccff;
}

/*音量条*/
.ai-wrap .ai-volume-bar {
    background-color: transparent;
    border-right: transparent;
}
.ai-wrap .ai-volume-bar:before {
    background-color: #b7eee7;
}
.ai-wrap .ai-volume-bar.ai-volume-bar-active:before{
    background-color: #d9f6f3;
}

/*进度条*/
.ai-wrap .ai-track-progress-bar{
    border-radius: 50px;
    background-color: #b8eee7;
}
.ai-wrap .ai-track-progress{
    border-radius: 50px;
    background-color: #66ccff;
}

/*滚动条*/
.ai-wrap .ai-scroll-wrap>div:last-child{
    background-color: #b5eee4;
}
.ai-wrap .ai-scroll-wrap>div:last-child div{
    background-color: #d9f6f3!important;
}
</style>
使用方法:
- 进入wordpress后端管理界面(其链接一般是你的网站主页网址/wp-admin)
- 比如我访问我的主页的网址是:https://blog.coolight.cool
- 则我的wordpress后端管理界面链接是:https://blog.coolight.cool/wp-admin/
- 进入管理界面后需要先填写管理员的账号和密码。
- 然后就可以进到这样的一个界面:

- 确保你的wordpress已经安装并启用了 AudioIgniter 插件:

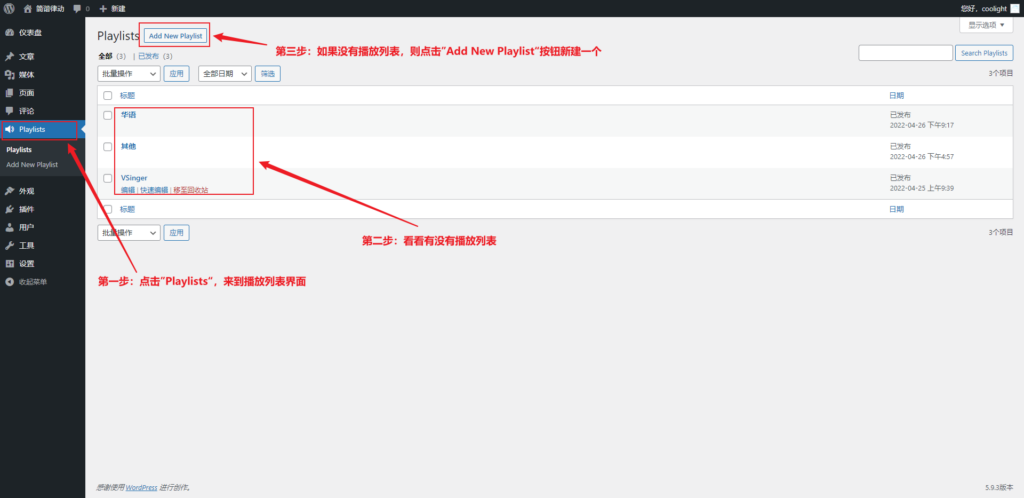
- 确保已经有一个播放列表。如果还没有创建或者你不知道这是什么,请跟着下面的步骤创建一个播放列表:
- 来到播放列表管理界面:
- -
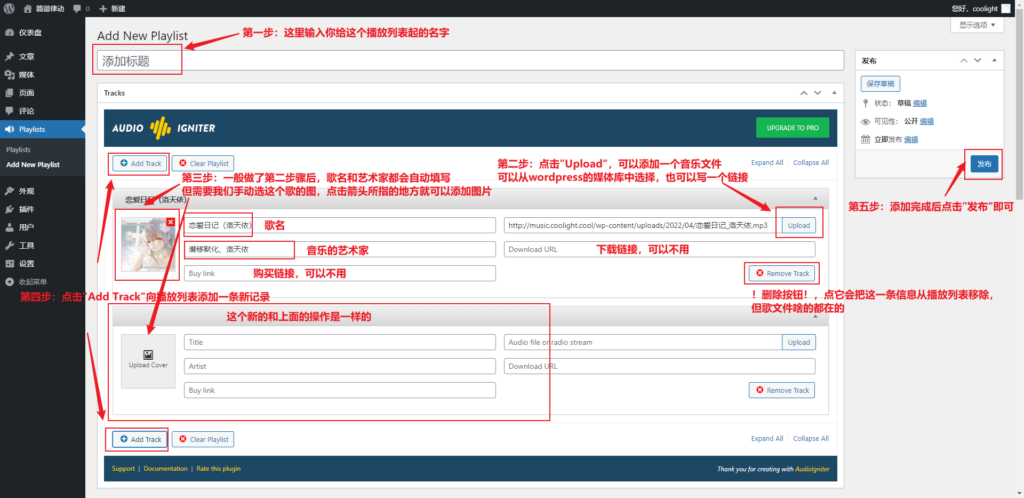
- 新建一个播放列表:
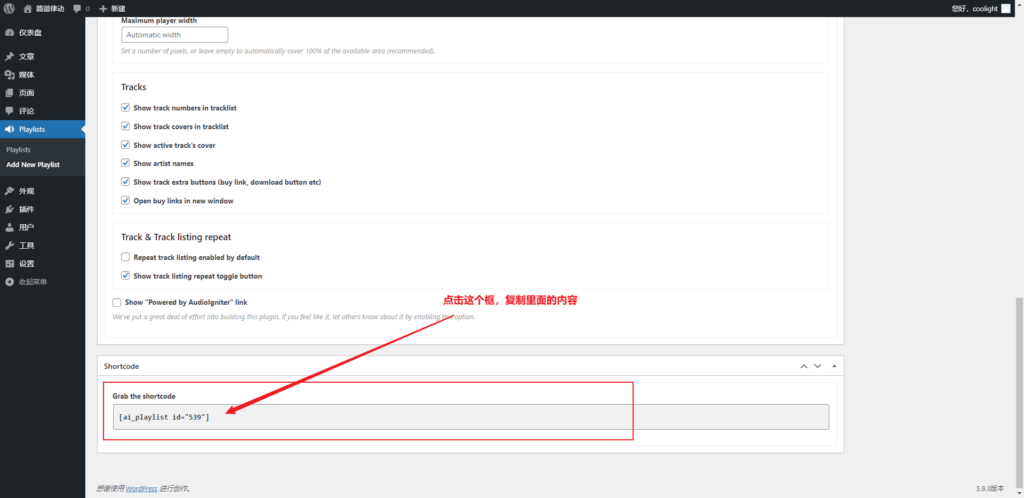
- 复制刚刚创建的播放列表的简码:
- 在刚刚添加播放列表的界面往下滑到底部,复制Shortcode的内容:
- 确保已经有一个 页面 或者是一篇 文章 :
- 这里我们新建一个文章为例:

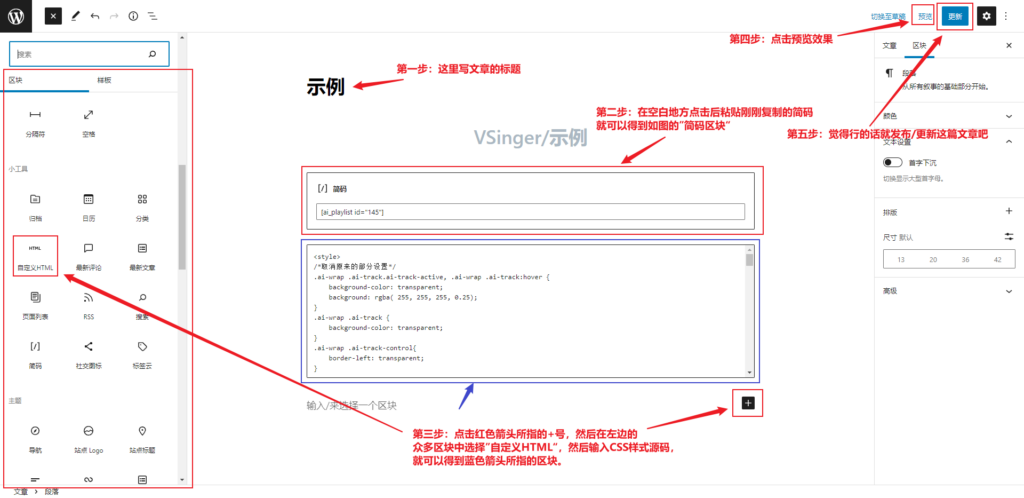
- 在页面或文章中插入简码以启用音乐播放器,并插入HTML代码修改其样式:
思路
- 首先在页面或文章中插入简码以启用音乐播放器:
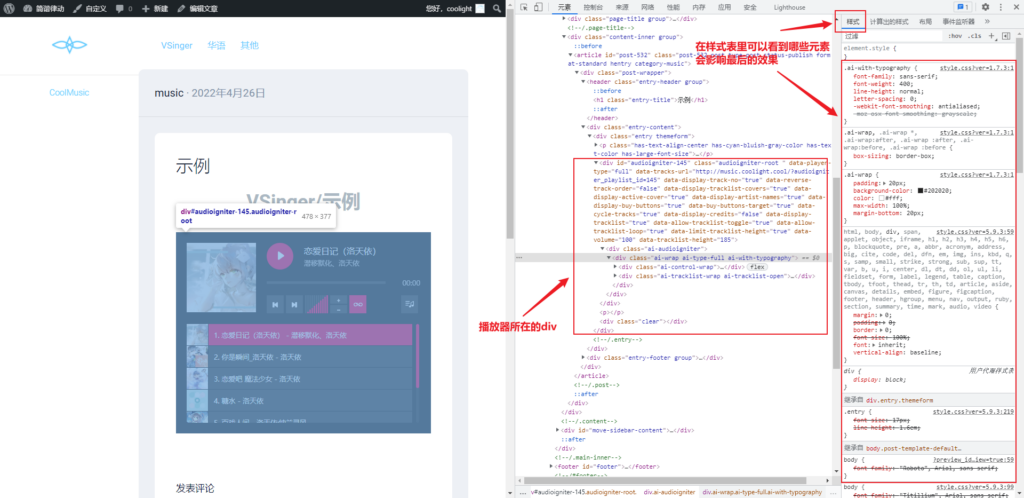
- 键盘按下F12,进入开发者工具,并点击“元素”:

- 当鼠标在”元素“列表里面移动时,浏览器就会提示对应的标签在页面的位置:

- 所以我们现在需要找到音乐播放器所在的元素标签,然后修改对应标签的CSS样式即可,如图的div就是播放器所在的容器:
- 找到想修改的目标以后,可以直接看它的class类名,然后写CSS样式来修改。
- 也可以在右边的样式表中取消一些样式的勾选,看看是否为想修改的样式,然后复制出来修改即可。
- 这里以修改播放器的背景色为例,颜色的样式在样式表中很明显,它会有一个小色块:

- 我们把background-color取消勾选看看:

- 可以看到,其背景色随之改变,所以我们就复制这个类名出来,并把样式background-color复制出来修改:

- -
- 注意:
- 如果这个类名很长,也建议全部复制,不然可能改不到!
- 比如这个,虽然很长,但建议复制横线画的整个(即左花括号‘ { ’之前的内容):

- 比如我们把原来的黑色 #202020,改为浅蓝色 #66ccff,把下面的代码插入到编辑文章页面的一个”自定义HTML“区块中:
<style>
.ai-wrap {
    background-color: #66ccff;
}
</style>- 如图操作后,其颜色就变了。
- 建议分屏操作,有双屏就更好了,毕竟左边的网页需要开着开发者模式看结构的。

- 如此操作,接着改其他想改的即可。
疑难杂症
如果想改的元素没有类名也没有id怎么办?
- 没有类名在CSS里也是可以定位到的,还是在开发者工具中找到它的样式,它样式的左花括号 ‘ { ’ 前面就是了。
- 比如Audiolgniter的滚动条
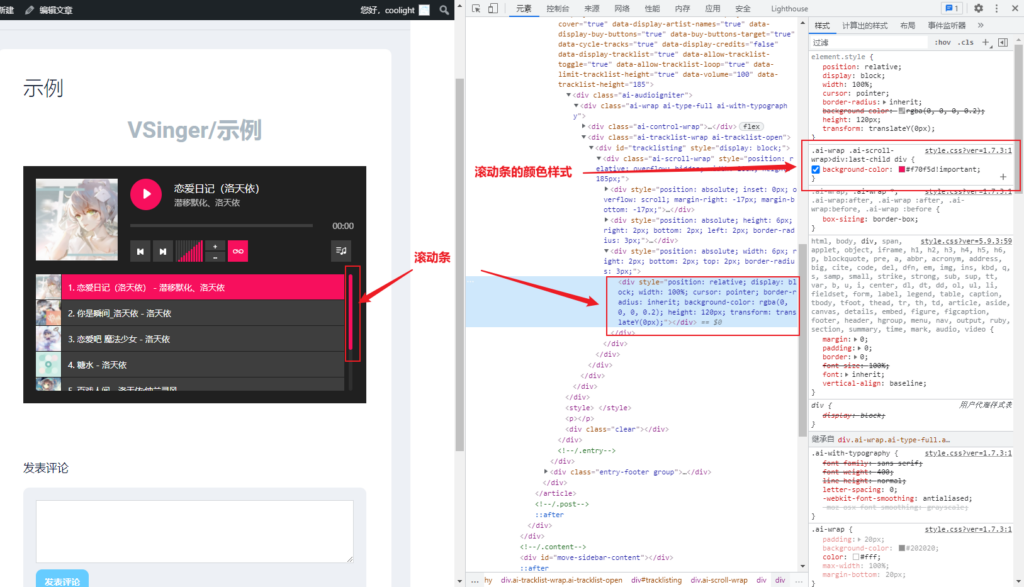
- 在样式表中,滚动条的颜色样式是这样的:
.ai-wrap .ai-scroll-wrap>div:last-child div {
    background-color: #f70f5d!important;
}- 那我们把它复制出来,改成蓝色 #66ccff 试试,注意保留后面的 !important:
.ai-wrap .ai-scroll-wrap>div:last-child div {
    background-color: #66ccff!important;
}- 然后插入“自定义HTML”中,并更新文章,然后刷新网页:

Introducing to you the most prestigious online entertainment address today. Visit now to experience now!
prednisone pack: prednisone ray pharm – prednisone steroids
amoxicillin buy online canada: Amoxicillin for sale – amoxicillin 500 mg for sale
buy prednisone online no prescription: order Prednisone – fast shipping prednisone
how to buy prednisone online: buy prednisone – purchase prednisone canada
You’re so interesting! I don’t believe I’ve read a single thing like this before. So nice to find another person with a few genuine thoughts on this subject matter. Seriously.. thank you for starting this up. This site is something that’s needed on the internet, someone with a little originality.
buying clomid without rx: rexpharm – cheap clomid online
where to buy prednisone without prescription: order Prednisone – prednisone prescription for sale
I’m impressed, I have to admit. Seldom do I come across a blog that’s both educative and interesting, and let me tell you, you have hit the nail on the head. The issue is something that not enough folks are speaking intelligently about. I am very happy I stumbled across this in my hunt for something regarding this.
amoxicillin pills 500 mg: amoxil com pharm – generic amoxicillin over the counter
buy priligy: buy priligy – Priligy tablets
price for 15 prednisone: cheapest prednisone no prescription – buy prednisone from canada
Priligy tablets: priligy max pharm – priligy max pharm
how to get clomid no prescription: rex pharm – where can i buy clomid no prescription